Download OpenAM Code Bundle

Book Cover


I have been receiving many emails from the readers asking for the files that is supposed to be made available via the publisher’s site. Any way I am uploading them here so  the readers can benefit out of it. I could not respond earlier than this, please accept my apologies.

Splunkweb SSO – with Search Head Clustering

This blog is an addendum to my earlier post on enabling SSO for Splunkweb administration console. That post deals with only one splunkweb instance. What if customer wanted to enable SSO for farm of search heads running behind a load balancer. This deployment is popular with the new search head clustering feature introduced in Splunk 6.2 version.

In order to enable the splunk web SSO for the search head clustering deployment, you need to have access to a load balancer (hardware or software with the ability to route the requests based on Cookie or IP persistence ) that plays the vital role to achieve the SSO seamlessly among the backend search heads. This procedure has been tested with both hardware and software load balancers.

  • Big IP with IP persistence – Hardware Load Balancer
  • Apache httpd reverse proxy with sticky cookies. – Software Load Balancer

The configuration is simple

  • Enable the SSO using the usual procedure as described here
  • Create the LDAP authorization strategy in all the participating search heads in the search head clustering deployment. (You can simply copy the authentication.conf to all the search heads, make sure the bind user password is in plain text before copying, once you restart the splunkd these plain text passwords will be obfuscated )
  • Set the load balancer configurations appropriately, especially the stickiness for the requests. If the requests ends up in the wrong server then you would see unexpected results.

Setting up Big IP LB for SHC

It is relatively easy to setup the sticky load balancing for the HTTP traffic. You can find documents related to this here

How to setup apache reverse proxy for SHC load balancing

In this section I am going to describe the procedure about the configuration of apache reverse proxy for load balancing along with cookie based persistence.

Pre-Requisites

  • Apache httpd server

    Server version: Apache/2.4.10 (Unix)Server built: Jan 1 2015 13:25:30Server’s Module Magic Number: 20120211:36Server loaded: APR 1.4.6, APR-UTIL 1.4.1Compiled using: APR 1.4.6, APR-UTIL 1.4.1

  • Required apache modules
    • headers_module
    • proxy_module
    • proxy_balancer_module
    • rewrite_module
    • authnz_ldap_module
  • An LDAP server for authentication

What needs to be configured at Search Heads?

In the search heads that participate in the search head clustering, please enable the usual SSO configuration properties.

web.conf

[settings]
 root_endpoint=/shc
 trustedIP = 127.0.0.1,10.140.104.34
 remoteUser = X_Remote_User
 SSOMode = permissive
 embed_uri = http://proxy.sv.splunk.com:8080/gpass
 allowSsoWithoutChangingServerConf = 1
 remoteUserMatchExact = 1

The above configuration has to be included in all the participating search heads in the search head clustering.

There are couple of new properties added in the Splunk enterprise 6.2

  • remoteUserMatchExact – When matching the remoteUser header, consider dashes and underscores distinct (so “Remote-User” and “Remote_User” will be considered different
    headers
  • allowSsoWithoutChangingServerConf – Usually when configuring SSO, a trustedIP needs to be set both here in web.conf and also in server.conf. If this is set to “1” then we will enable web-based SSO without a trustedIP in server.conf
  • authentication.conf –  Create the LDAP authorization strategy in all the participating search heads in the search head clustering deployment. (You can simply copy the authentication.conf to all the search heads, make sure the bind user password is in plain text before copying, once you restart the splunkd these plain text passwords will be obfuscated ). The LDAP server that is used in this configuration file must be the same as in the httpd.conf used for reverse proxy authentication.

Restart the whole cluster by issuing splunk rolling-restart shcluster-members

That is it, you are ready to setup the load balancing using the apache http server.

Configuring the Apache Web server as Load balancer

Once you configure the apache http server with required modules, you can go ahead configure the web server to act like a load balancer. Here are the relevant portion that needs to be configured for apache http server.

httpd.conf changes

Add the following portion of configuration code that goes in the httpd.conf by-passes the authentication so the embedded reports can be accessed anonymously.

gpass


The above configuration snippet enables the embedded reports so when embedded reports are created, those reports will not go through the authentication process, these will be authenticated anonymously.

The next set of configuration stanza enables the following

  • Introduces the LDAP authentication for the URL context /shc
  • Set the X_REMOTE_USER with the user name of the authenticated identity
  • Inserts the ROUTEID cookie that will be used for the sticky load balancing, it is critical to make the LB work correctly.

location

Include the following line as part of httpd.conf

Include conf/extra/httpd-LB.conf

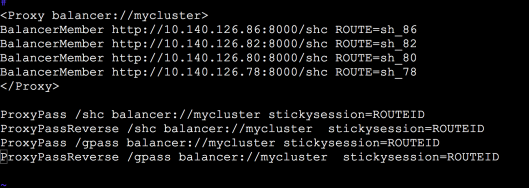
This file has the definition of the backend search heads that participate in the search head clustering. The content of the conf/extra/httpd-LB.conf file looks like this:

lb

Once you restart the proxy with these settings, it will be ready for testing SHC via the load balancer.

How to test

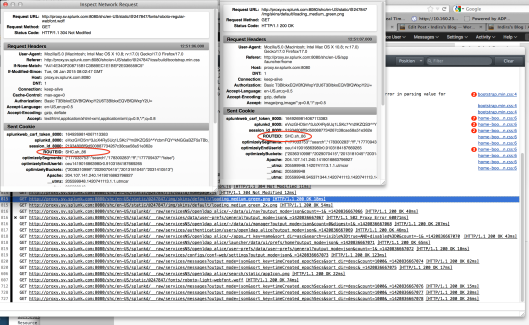
Invoke the proxy url http://proxy.sv.splunk.com:8080/shc, it will redirect to one of the back end server. You can inspect the requests sticking to a particular back end SH, based on the value for ROUTEID. As you can see the screen shot below taken from one of the session via the reverse proxy. The cookie value is computed as SHC.ROUTE as defined in the httpd.conf. If you have noticed the user name in the splunk web nav bar is missing, then all the likely it is due to non sticky load balancing.

routeid

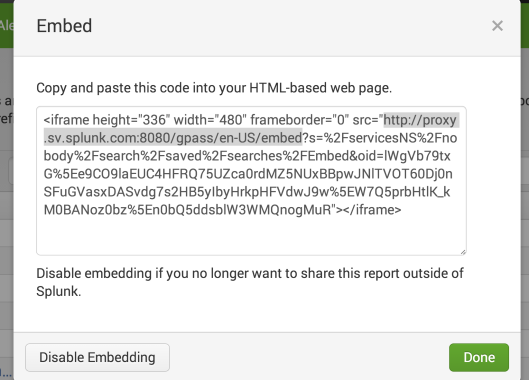
Embedded Reports Can be created from teh splunkweb, when you create it will automatically populate the anonymous url with context /gpass as you can see below

embed

How to disable SSL protocol in Splunk to mitigate poodle vulnerability

Tags

, , , ,

SSL Doom’d

With poodle SSL protocol pretty much dead, many of the commercial websites already turned off SSL protocol support or in the process of deprecating them. What is the story with Splunk, that predominantly leverage SSL/TLS protocol for its communications. Yes, Splunk has introduced an option in Splunk 6.2(other versions also will be supporting this, check with Splunk support for the availability) to disable the SSL protocol so customers can choose to disable the SSLv3,SSLv2 communications.

How to Disable SSL for Splunkd (for Indexer/Forwarder)

In order to disable SSL protocol, you need to set the following property in your  SPLUNK_HOME/etc/system/local/server.conf

[sslConfig]
sslVersions = *,-ssl2,-ssl3
cipherSuite = TLSv1.2:!eNULL:!aNULL

After setting this property you need to restart your splunk forwarder/indexer, After restart your splunkd will accept only TLS connections. You can verify this in the following manner.

An entry in the splunkd.log

11-06-2014 11:40:14.318 -0800 INFO loader - Server supporting SSL versions TLS1.0,TLS1.1,TLS1.2
 11-06-2014 11:40:14.318 -0800 INFO loader - Using cipher suite TLSv1.2:!eNULL:!aNULL

note there is no SSL protocol support.

How to do a runtime validation if you don’t trust the log entries. Here is how ti can be accomplished.

openssl s_client -connect localhost:1901 -ssl3
CONNECTED(00000003)
140089763423912:error:14094410:SSL routines:SSL3_READ_BYTES:sslv3 alert handshake failure:s3_pkt.c:1292:SSL alert number 40
140089763423912:error:1409E0E5:SSL routines:SSL3_WRITE_BYTES:ssl handshake failure:s3_pkt.c:615:
---
no peer certificate available
---
No client certificate CA names sent
---
SSL handshake has read 7 bytes and written 0 bytes
---
New, (NONE), Cipher is (NONE)
Secure Renegotiation IS NOT supported
Compression: NONE
Expansion: NONE
SSL-Session:
 Protocol : SSLv3
 Cipher : 0000
 Session-ID: 
 Session-ID-ctx: 
 Master-Key: 
 Key-Arg : None
 PSK identity: None
 PSK identity hint: None
 SRP username: None
 Start Time: 1415303037
 Timeout : 7200 (sec)
 Verify return code: 0 (ok)
---

A SSLv2 connection also fails as expected

openssl s_client -connect localhost:1901 -ssl2
CONNECTED(00000003)
write:errno=104
---
no peer certificate available
---
No client certificate CA names sent
---
SSL handshake has read 0 bytes and written 45 bytes
---
New, (NONE), Cipher is (NONE)
Secure Renegotiation IS NOT supported
Compression: NONE
Expansion: NONE
SSL-Session:
 Protocol : SSLv2
 Cipher : 0000
 Session-ID: 
 Session-ID-ctx: 
 Master-Key: 
 Key-Arg : None
 PSK identity: None
 PSK identity hint: None
 SRP username: None
 Start Time: 1415303140
 Timeout : 300 (sec)
 Verify return code: 0 (ok)
--

Where as a TLS connection goes through successfully.(ignore the CA cert validation, you get the point.:-)

openssl s_client -connect localhost:1901 -tls1_2
CONNECTED(00000003)
depth=1 C = US, ST = CA, L = San Francisco, O = Splunk, CN = SplunkCommonCA, emailAddress = support@splunk.com
verify error:num=19:self signed certificate in certificate chain
verify return:0
---
Certificate chain
 0 s:/CN=SplunkServerDefaultCert/O=SplunkUser
 i:/C=US/ST=CA/L=San Francisco/O=Splunk/CN=SplunkCommonCA/emailAddress=support@splunk.com
 1 s:/C=US/ST=CA/L=San Francisco/O=Splunk/CN=SplunkCommonCA/emailAddress=support@splunk.com
 i:/C=US/ST=CA/L=San Francisco/O=Splunk/CN=SplunkCommonCA/emailAddress=support@splunk.com
---
Server certificate
-----BEGIN CERTIFICATE-----
MIICLTCCAZYCCQDPc+vw483gJTANBgkqhkiG9w0BAQUFADB/MQswCQYDVQQGEwJV
UzELMAkGA1UECBMCQ0ExFjAUBgNVBAcTDVNhbiBGcmFuY2lzY28xDzANBgNVBAoT
BlNwbHVuazEXMBUGA1UEAxMOU3BsdW5rQ29tbW9uQ0ExITAfBgkqhkiG9w0BCQEW
EnN1cHBvcnRAc3BsdW5rLmNvbTAeFw0xNDA5MjcwNjMzMjNaFw0xNzA5MjYwNjMz
MjNaMDcxIDAeBgNVBAMMF1NwbHVua1NlcnZlckRlZmF1bHRDZXJ0MRMwEQYDVQQK
DApTcGx1bmtVc2VyMIGfMA0GCSqGSIb3DQEBAQUAA4GNADCBiQKBgQDNWcEbfS9/
j8ZxQRBHXCiYY2DdEhgQiw97nl6tjNOZ8k2Ma+TPEbyfA8WI8wBItE1G7YlkqhVL
I6b2njCEB2qmpQp8TgxVNsDw8y9as9oBFFCeT7SllvFzZu7upmaz9/z28imgOrvF
+4VVRReiWfSpqKO40lDM/NE+EUDWx7UkDwIDAQABMA0GCSqGSIb3DQEBBQUAA4GB
AGzUp/NR7dslJnwSUMs3PSnjFwf41iSgI8YOpoFaexB+gEhDeNGx8xP64/E/PF6C
qok9JTAlm2XOx3ekZbEKvSZjDrWy7wzZFWO/e77n2XVQVAQzo7gIy9cz8PVG3alO
FnlP3W3QdHBpLzdeYPVNxW8PkjBK46kPsEp8aFkwtizI
-----END CERTIFICATE-----
subject=/CN=SplunkServerDefaultCert/O=SplunkUser
issuer=/C=US/ST=CA/L=San Francisco/O=Splunk/CN=SplunkCommonCA/emailAddress=support@splunk.com
---
No client certificate CA names sent
---
SSL handshake has read 1519 bytes and written 504 bytes
---
New, TLSv1/SSLv3, Cipher is AES256-GCM-SHA384
Server public key is 1024 bit
Secure Renegotiation IS supported
Compression: zlib compression
Expansion: zlib compression
SSL-Session:
 Protocol : TLSv1.2
 Cipher : AES256-GCM-SHA384
 Session-ID: 1F1A78A0D2F412C2F7002178A8B0AFDD31237514AF7DCF5B0CE55445BC3E168B
 Session-ID-ctx: 
 Master-Key: F2C642674101E18263745A5C0D0D099C38034EAC49FD98A85C8224F498BB9802A5C432D6F31F318B0AB2014D42B49E2E
 Key-Arg : None
 PSK identity: None
 PSK identity hint: None
 SRP username: None
 TLS session ticket lifetime hint: 300 (seconds)
 TLS session ticket:
 0000 - 13 1d 01 c2 f0 ab 4a 7a-3b f2 cd 87 31 7f 18 93 ......Jz;...1...
 0010 - 82 f7 65 6a 5e 90 4b 7d-c2 4d 72 8d e8 72 23 77 ..ej^.K}.Mr..r#w
 0020 - 91 ca b0 65 f7 a9 46 6c-f0 26 5b 30 ea bd b3 55 ...e..Fl.&[0...U
 0030 - 7a 84 51 ae 39 3e bd d6-c8 03 b9 6c 10 d8 22 8e z.Q.9>.....l..".
 0040 - 45 f5 f0 b1 e6 b6 80 f4-d8 66 8b 04 e3 6a ff 2f E........f...j./
 0050 - cd 49 92 4f 2e 53 f9 82-90 33 03 a4 31 2a 6c 99 .I.O.S...3..1*l.
 0060 - 05 3b 74 6c cd e3 da c7-6c 66 61 d0 80 2a 36 9e .;tl....lfa..*6.
 0070 - db d0 ac 19 f4 ee d1 be-8b 9b e0 d8 bd eb 9f c5 ................
 0080 - 1b ca 8d 9b d3 43 2e 7a-72 d4 c1 1d e6 0c 05 81 .....C.zr.......
 0090 - ec 9b 00 0b bd 0b 6e 89-e4 7c 28 54 1d 90 e9 5f ......n..|(T..._
Compression: 1 (zlib compression)
Start Time: 1415303356
 Timeout : 7200 (sec)
 Verify return code: 19 (self signed certificate in certificate chain)

Ok ,that is for the splunkd communication over TLS, what about Splunkweb? We need to modify the web.conf to make that happen. BTW, the entry

cipherSuite = TLSv1.2:!eNULL:!aNULL

ensures the cipher suite selected for establishing TLS session is the highest secure one. You can default it by commenting this line.

How To Disable SSL for Splunkweb

Similar to the splunkd it is straight forward for splunkweb as well except you need to modify the SPLUNK_HOME/etc/system/local/web.conf file with following content

[settings]
httpport = 1900
mgmtHostPort = 127.0.0.1:1901
sslVersions = *,-ssl2,-ssl3
enableSplunkWebSSL = true
cipherSuite = TLSv1.2:!eNULL:!aNULL

After restarting the splunkweb, you can verify the connection to splunkweb is not supporting SSL protocol.

Forcing SSLv2 connection fails

openssl s_client -connect localhost:1900 -ssl2
CONNECTED(00000003)
write:errno=104
---
no peer certificate available
---
No client certificate CA names sent
---
SSL handshake has read 0 bytes and written 45 bytes
---
New, (NONE), Cipher is (NONE)
Secure Renegotiation IS NOT supported
Compression: NONE
Expansion: NONE
SSL-Session:
 Protocol : SSLv2
 Cipher : 0000
 Session-ID: 
 Session-ID-ctx: 
 Master-Key: 
 Key-Arg : None
 PSK identity: None
 PSK identity hint: None
 SRP username: None
 Start Time: 1415312416
 Timeout : 300 (sec)
 Verify return code: 0 (ok)
---


FORCING SSLv3 CONNECTION FAILS


 openssl s_client -connect localhost:1900 -ssl3
CONNECTED(00000003)
140287750391464:error:14094410:SSL routines:SSL3_READ_BYTES:sslv3 alert handshake failure:s3_pkt.c:1292:SSL alert number 40
140287750391464:error:1409E0E5:SSL routines:SSL3_WRITE_BYTES:ssl handshake failure:s3_pkt.c:615:
---
no peer certificate available
---
No client certificate CA names sent
---
SSL handshake has read 7 bytes and written 0 bytes
---
New, (NONE), Cipher is (NONE)
Secure Renegotiation IS NOT supported
Compression: NONE
Expansion: NONE
SSL-Session:
 Protocol : SSLv3
 Cipher : 0000
 Session-ID: 
 Session-ID-ctx: 
 Master-Key: 
 Key-Arg : None
 PSK identity: None
 PSK identity hint: None
 SRP username: None
 Start Time: 1415312551
 Timeout : 7200 (sec)
 Verify return code: 0 (ok)
---

Forcing to make TLS1.1 connection – should fail

openssl s_client -connect localhost:1900 -tls1_1
CONNECTED(00000003)
139639458277032:error:14094410:SSL routines:SSL3_READ_BYTES:sslv3 alert handshake failure:s3_pkt.c:1292:SSL alert number 40
139639458277032:error:1409E0E5:SSL routines:SSL3_WRITE_BYTES:ssl handshake failure:s3_pkt.c:615:
---
no peer certificate available
---
No client certificate CA names sent
---
SSL handshake has read 7 bytes and written 0 bytes
---
New, (NONE), Cipher is (NONE)
Secure Renegotiation IS NOT supported
Compression: NONE
Expansion: NONE
SSL-Session:
 Protocol : TLSv1.1
 Cipher : 0000
 Session-ID: 
 Session-ID-ctx: 
 Master-Key: 
 Key-Arg : None
 PSK identity: None
 PSK identity hint: None
 SRP username: None
 Start Time: 1415312590
 Timeout : 7200 (sec)
 Verify return code: 0 (ok)
---

This should fail because of the following entry in web.conf

cipherSuite = TLSv1.2:!eNULL:!aNULL

if you comment this, you can make TLS1.x connection but not SSL connection

Here is the test for verifying TLS1.2 connection

openssl s_client -connect localhost:1900 -tls1_2
CONNECTED(00000003)
depth=0 CN = qa-mytest-01.sv.splunk.com, O = SplunkUser
verify error:num=20:unable to get local issuer certificate
verify return:1
depth=0 CN = qa-mytest-01.sv.splunk.com, O = SplunkUser
verify error:num=27:certificate not trusted
verify return:1
depth=0 CN = qa-mytest-01.sv.splunk.com, O = SplunkUser
verify error:num=21:unable to verify the first certificate
verify return:1
---
Certificate chain
 0 s:/CN=qa-mytest-01.sv.splunk.com/O=SplunkUser
 i:/C=US/ST=CA/L=San Francisco/O=Splunk/CN=SplunkCommonCA/emailAddress=support@splunk.com
---
Server certificate
-----BEGIN CERTIFICATE-----
MIICMTCCAZoCCQDPc+vw483gJjANBgkqhkiG9w0BAQUFADB/MQswCQYDVQQGEwJV
UzELMAkGA1UECBMCQ0ExFjAUBgNVBAcTDVNhbiBGcmFuY2lzY28xDzANBgNVBAoT
BlNwbHVuazEXMBUGA1UEAxMOU3BsdW5rQ29tbW9uQ0ExITAfBgkqhkiG9w0BCQEW
EnN1cHBvcnRAc3BsdW5rLmNvbTAeFw0xNDA5MjcwNjMzMjRaFw0xNzA5MjYwNjMz
MjRaMDsxJDAiBgNVBAMMG3FhLXN5c3Rlc3QtMDEuc3Yuc3BsdW5rLmNvbTETMBEG
A1UECgwKU3BsdW5rVXNlcjCBnzANBgkqhkiG9w0BAQEFAAOBjQAwgYkCgYEAvDSQ
C28QErqvX7ff+SCCkkKVGAS6xQohusmNZGhFIkSVul+ZGU9LYQMRRF4vA2c196rm
jd3Qt/NzNOE0DKojqb65+Nw1u9GGPF8/A1SHsXoF0nTt3xe1RDmL8MT12ByhL7lc
1yILGBwS6h7GMT7yUl9JcnYpU12qCd2LduhF0f0CAwEAATANBgkqhkiG9w0BAQUF
AAOBgQCAT/RCo+vKB/qWwPP2M6NsmqnOdrwoeNUv53QYYMU8wquv+RzlwuJw4isb
1J5hjZFAlrLLSQfzd2Eqlh8x1yrw2kArt589wCuA9rd5xeuSK7Vd9u76t2w4cXjq
ZHEzhKkbB2Wbzdy613lUdK+6sWWYSwPQlXls/Ostu0zGXD96mg==
-----END CERTIFICATE-----
subject=/CN=qa-mytest-01.sv.splunk.com/O=SplunkUser
issuer=/C=US/ST=CA/L=San Francisco/O=Splunk/CN=SplunkCommonCA/emailAddress=support@splunk.com
---
No client certificate CA names sent
---
SSL handshake has read 878 bytes and written 496 bytes
---
New, TLSv1/SSLv3, Cipher is AES256-GCM-SHA384
Server public key is 1024 bit
Secure Renegotiation IS supported
Compression: NONE
Expansion: NONE
SSL-Session:
 Protocol : TLSv1.2
 Cipher : AES256-GCM-SHA384
 Session-ID: 8C9B759F7C19FD07EB745E028D24CE333A1122BAD943AE8761422AA9FB5E8A97
 Session-ID-ctx: 
 Master-Key: F0B7AC07E8CA1D728E7C196792A2C5B524F49650ABA4C2397C17B7F5CCD1B018DD6326D64407082EF67F19AABD2AE5E4
 Key-Arg : None
 PSK identity: None
 PSK identity hint: None
 SRP username: None
 TLS session ticket lifetime hint: 300 (seconds)
 TLS session ticket:
 0000 - d1 4a 07 15 81 60 46 eb-00 1e 60 9d 0b 72 84 43 .J...`F...`..r.C
 0010 - 84 75 c1 ce ff 0c cf 48-e3 07 4d c3 8d a6 48 e0 .u.....H..M...H.
 0020 - 52 ce a0 98 86 61 73 83-84 eb 21 47 cd fe 86 e4 R....as...!G....
 0030 - 26 1c c0 c8 9b 04 9e a6-63 64 4e f6 27 ad cf 38 &.......cdN.'..8
 0040 - 74 b1 9d a5 c7 84 fd e8-0b bc 6a 33 d4 dc 29 34 t.........j3..)4
 0050 - d0 6c 7b 00 b5 41 d6 5b-ff b0 62 9e 32 2d a7 02 .l{..A.[..b.2-..
 0060 - fd 84 ed f0 f6 6d 4d 36-11 ca 9e 30 61 f3 d1 57 .....mM6...0a..W
 0070 - 67 34 e6 e3 09 96 f6 ae-7e f6 c0 91 21 b1 b0 09 g4......~...!...
 0080 - 31 3e ad db 08 90 5f 02-ba 9d b2 cc 05 5a 6b aa 1>...._......Zk.
 0090 - 73 52 e9 df c9 90 bf 6c-d4 01 c8 3f c7 be f1 d0 sR.....l...?....
Start Time: 1415312760
 Timeout : 7200 (sec)
 Verify return code: 21 (unable to verify the first certificate)
---


Splunkweb SSO

Tags

, ,

What is SSO?

Single sign-on (SSO)is an identity authentication process that permits an identity to enter one identity name and password in order to get access multiple applications. The process authenticates the identity(a user or device or an app) for all the applications they have been given(authz) rights to and eliminates further prompts when they switch applications during a particular session.

There are multiple ways to implement SSO solution in an enterprise infrastructure, discussion about various forms of SSO is outside of the scope of this article. Splunk employs a proxy based SSO solution which is bit different from the traditional web cookies based SSO, it does not leverage any standards based protocols such as SAML to implement its SSO solution.

Splunkweb SSO:

  • Not a password reset mechanism
  • Not a replacement for an identity management solution
  • Does not change/add any data in to your LDAP infrastructure, All it requires is read-only access to your identity data.
  • Splunk CLI cannot participate in this SSO
  • Splunk configuration management  port does not rely on cookies hence it cannot benefit from the SSO. This means invoking https://localhost:8089 will still require authentication regardless of the existence of SSO.

Pre-requisites

The goal of  Splunkweb SSO configuration is to delegate the Splunkweb authentication to the customer’s centralized IT authentication systems.  Splunk itself does not implement any SSO solution by means of leveraging industry standards based protocols. To establish a splunkweb session it relies on a trusted identity passed (typically set and sent by a Proxy) on to Splunkweb as an HTTP request header by the enterprise’s authentication systems.  Note that there is no cookies involved here to establish the trust between the IT system and Splunk, meaning intermediaries like proxies are not required to set any domain cookie and forward them to Splunkweb.

In order to make this proxy based SSO work, following pre-requisites must be met for the scenario that I have tested. There are other ways to implement this solution such as having a IAM product set the header with required identity, from then on the process is same as I have described in this article.

  • A Proxy Server (typically IIS or Apache, for this exercise Apache/2.2.15 used)
  • Apache Server Configured as reverse proxy with mod_proxy_http.so and mod_ldap.so enabled
  • A LDAP Server provisioned with appropriate groups and users.
  • No Authz configured, Authz will be done by splunkd
  • A working Splunk system

How it works?

Splunk administrators and users invoke the splunkweb  via the proxy URL that is deployed in front of the splunkweb as shown in the Figure 1.  The proxy is configured to authenticate the incoming request , upon successful authentication it will set the request header with the authenticated identity’s attribute(could be uid or whatever you want to pass it on). If Basic authentication is used(in this exercise BASIC authentication employed) then the authorization header is also set in the browser. Once this header is available subsequent access to the proxy URL will not seek for authentication again, it will keep reusing this authz header. Only way is to close the browser to clear the authorization header consequently to force the authentication again.

The proxy server makes a request to splunkweb along with the request header, for this exercise let  it be X-Remote-User, remember the request headers are case-sensitive.  Splunkweb is configured for SSO and it knows where to look for the identity information(the web.conf property remoteUser = X-Remote-User ) along with the check for the incoming IP address in the trustedIP list, again this is configured in the web.conf for the property trustedIP.  If the  incoming client IP is in the trustedIP list of the splunkweb configuration, then it proceeds by making a request for authz for the given identity in the request header.
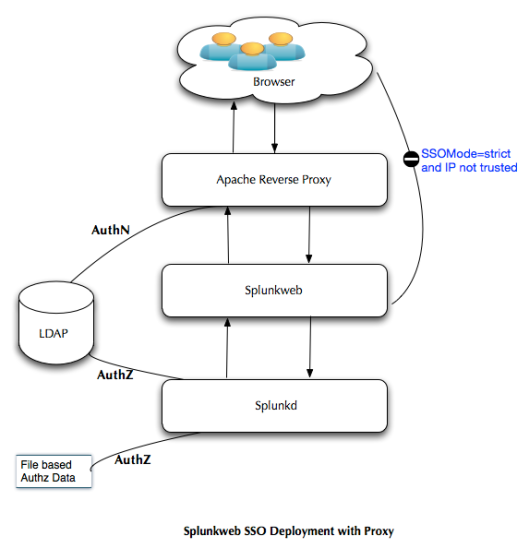
Splunkweb_SSO_Deployment

Splunkweb SSO Deployment – Figure 1

At this point, upon receiving the request from splunkweb, splunkd verifies whether the incoming IP address matches the value of trustedIP property of the server.conf, this is a single valued property unlike the trustedIP property in web.conf which multi valued. If the IP is trusted  then it will initiate the authorization process for the given identity in the request header(value of X-Remote-User). In both cases if the incoming IP address is not in the trustedIP list then the SSO will be rejected as shown in the Figure 2.

This authorization is performed at two stages as shown in the Figure 1.

File based authorization aka. Splunk authorization

In this case the splunkd checks if the given identity matches any of the splunk role(s) that are stored in the file system.  if it found a match then the authorization process is immediately terminated even though there are other LDAP authorization strategies are  configured in the system. It goes on creating a new session for the authorized identity provided  no session already exist for the identity in the request header. If a session already exists it just uses that session identifier and based on that creates the necessary cookies for splunkweb’s consumption, Once the cookies are present, the splunkweb resumes its flow as if it had authenticated in a non-SSO fashion. Any subsequent access to splunk  via the proxy URL does not require re-authentication as long as the request header contains the trusted identity. Even if the splunkd session times out or destroyed for whatever reason, the BASIC auth authorization header along with the request header value, the splunkd will seamlessly create the session for the identity by repeating the authz process described earlier. The trustedIP property holds good for ever so a check for client IP match against these IP addresses will always be enforced, failing to match the trusted IP will result in SSO failure(strict mode only). Splunkd always performs authorization against its file based identity data irrespective of whether a LDAP strategy configured or not.  This is a mandatory authorization process that cannot be disabled by means of a configuration tweak.

LDAP based Authorization

What happens if the Splunk Authz fails to find a match in its local identity database?, Well, when this happens it examines the configuration to determine if there are any LDAP strategy configured and enabled, if there is one then it will try to find a matching splunk role/LDAP group mapping for the identity, if  a match found then it returns expeditiously, otherwise it iterates through all the enabled LDAP strategies until it finds a match or it exhausted  with all the active LDAP strategies, implying no authorization match found. In this case it redirects the browser to /account/sso_error page as shown in the Figure 2.

LDAP based authorization is an optional step that only kicks off when there is no match found in the splunk’s native identity database.  If no LDAP strategies are configured or enabled then there will not be a LDAP based authorization performed.

The entire control flow of how the single sign on process works is depicted below in the Figure 2.
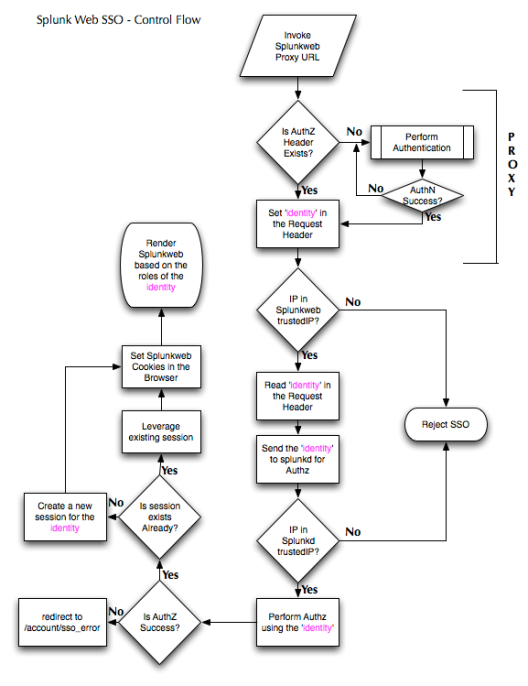
Splunkweb SSO control Flow - Figure 2

Splunkweb SSO control Flow – Figure 2

Properties that arbitrate SSO behavior

There are number of properties that needs to be set in order to orchestrate the single sign on process. These properties emanates from  splunk web’s web.conf and server.conf for splunk daemon. In this section let me unravel the merits of setting or not setting these properties. All the properties that are proxy specific deferred to the later section as they do not fall  under the purview of Splunk.

Properties Specific to Splunkweb

Properties discussed in this section are pertaining to the Splunk’s http web server, apparently most of the SSO properties affect the splunkweb as the SSO is about the splunkweb not Splunk daemon or Splunk command line interface.

The following properties in web.conf (SPLUNK_HOME/etc/system/local) needs to be configured

  • remoteUser

This property determine the authenticated  identity’s attribute  that is passed by the proxy server via the HTTP request header. In this exercise it is named X-Remote-User.  Typically it would be the RDN of the identity if stored in a LDAP server. Nevertheless any LDAP attribute can be passed via this request header as long as the proxy sets this attribute properly after authentication.  Be mindful about the use of request headers instead of response headers.  If you configure your proxy to set response header by using Header directive, then the SSO will not happen as Splunk will only read request headers to obtain the trusted identity’s attribute. You must use RequestHeader directive in your proxy configuration to pass the identity’s attribute to Splunk. Splunk defaults this value to REMOTE_USER.

  • SSOMode

Splunkweb SSO can operate in two modes, both giving certain level of security to protect the Splunkweb resources. All the resources in the splunkweb that can be accessed anonymously will not be impacted by this property value. As of this writing the default value is permissive. If this property is not set then it defaults to permissive mode as well. This property can take the following two values:

    • strict

This is the most hardened mode, Splunk recommends customers to deploy in this mode. With this mode in place, any access to the splunkweb resources will be allowed only to the client IP addresses listed in trustedIP property(see below). All the requests that are not originating from those trustedIP list will summarily be rejected by splunkweb. Whether the request is made via proxy URL or directly by using the splunk host/IP address, request will be rejected if the client’s IP address is not listed in the trustedIP property. It is very important to set the tools.proxy.on = True to enable Splunkweb to get the client IP address instead of proxy’s IP address, if you are using a reverse proxy as I did for this exercise.

    • permissive

This mode behaves exactly same as above except the fact that the requests will be served by the splunkweb by directly hitting the splunkweb url, not via the reverse proxy server(as opposed to the “strict” mode, where it is not possible to login even via splunkweb direct url). even though the client’s originating IP address is not in the trustedIP list. This mode is meant for testing and troubleshooting scenarios. It is susceptible  to cookie hijack attacks. Use this mode at your discretion.

  • trustedIP

This property is a multivalued list that contains the list of client IP addresses. Splunkweb will serve only the requests originating from these clients, any requests that is not coming from these IP addresses will be rejected if SSOMode=strict. In the permissive mode splunkweb will continue to serve all the requests as long as authentication and authorizations are proper. Typically this address will be set to the proxy’s IP address unless tools.proxy.on = True  is set.

  • tools.proxy.on

It is a boolean property takes either True or a False value.  Out of the box this property is not set. In a reverse proxy scenario if you want authorize based on the browser’s IP address then set this property to a True value. A False value will authorize based on the proxy’s IP address.

  • root_endpoint

This property defines the context for the splunk web, by default it is same as root context of the proxy and splunk app server. Customers can use this property to redefine the root context of the web/app server to some thing else. For instance

root_endpoint=/lzone

in the web.conf file under settings stanza. With this settings splunkweb will be accessed via http://splunk.example.com:8000/lzone instead of http://splunk.example.com:8000/ . To make the proxy aware of this, you have to map it accordingly in the httpd.conf. Some thing like

ProxyPass /lzone    http://splunkweb.splunk.com:8000/lzone
ProxyPassReverse /lzone   http://splunkweb.splunk.com:8000/lzone

This concludes the relevant properties that needs to be configured in the web.conf.

Properties Specific to Splunk daemon

There is only one property that is pertinent to the splunk daemon, which is trustedIP. This needs to be set in the server.conf under general stanza.

  • trustedIP

This property plays the key role in determining whether SSO is enabled or not in a Splunk deployment. If this property is not set then the SSO for the splunk will not be enabled. It is a single valued property unlike its splunkweb counter part.  Typically it is almost always the value of IP address of the Splunkweb’s host.

That concludes the  “How  it works” section of this article.  In the next few sections I am going to walk you through an exercise of configuring SSO for Splunkweb using Apache proxy server.

Test Servers

WARNING:
It is highly recommended any HTTP header based solutions must be  implemented over a TLS/SSL enabled deployment. In my testing I am just defaulting to open mode for academic testing purposes.  Customers MUST not deploy this solution sans securing their transport layer. 
 

Configuring Apache Proxy

There are a lot of documents in the internet on how to configure the Apache mod_proxy server. In my testing I have used a Apache server(2.x on Linux) with mod_proxy and mod_ldap enabled to avail proxy and LDAP authentication.

Here are the three critical configurations that needs to be performed in the httpd.conf of the Apache server.

  • Setup   proxy  URL for Splunkweb

It is a very straightforward process to configure the Apache server in to a reverse proxy. Here is the relevant part of the httpd.conf that configure the proxy for splunkweb, this can appear under your virtual server instance or at the global level.

ProxyRequests Off
ProxyPassInterpolateEnv On
ProxyPass / http://10.3.1.61:8000/
ProxyPassReverse / http://10.3.1.61:8000/
  • Setup Authentication

This is the key step in the SSO configuration as Splunk off loads the authentication process to the proxy, hence it is a required step to authenticate the incoming connection in order to set the request header with authenticated identity’s attribute. In this exercise I have used the OpenDS server  to perform the user authentication. The configuration looks pretty trivial if the mod_ldap is enabled. The following configuration text should appear between <Location “/”> and </Location>

  AuthType Basic
AuthBasicProvider ldap
AuthName "Splunk Proxy Web Site: Login with User ID "
 AuthLDAPURL ldap://10.3.1.61:1389/ou=people,O=Splunk Inc.,L=San Francisco,c=US?cn?sub?(objectClass=inetorgperson)
 AuthLDAPBindDN "cn=directory manager"
AuthLDAPBindPassword mysecret
require valid-user
  • Setup Request Header to pass the identity information

Once the authentication is successful, the proxy server supposed to set the request header that will be consumed by the Splunkweb to perform the SSO integration. You can set any value in the header as long as your splunkweb can make sense out of it to perform the authorization. Typically it will be set to the value of the LDAP strategy’s user naming attribute for eg: value of the  uid.  Here is how it is configured in the httpd.conf, The following configuration text should appear between <Location “/”> and </Location>

  RewriteEngine on 
  RewriteRule .* - [E=RU:%{REMOTE_USER}]
  RequestHeader set X_REMOTE_USER %{RU}e

 This complete the configuration portion in the apache server. There is a subtle point to note here, even though the request header name is set as X_REMOTE_USER, but at the receiving end it is showing up as X-Remote-User so be aware of this and set the remoteUser property accordingly in the web.conf.

Configuring Splunkweb properties

We have discussed about the functionality of these properties at length earlier, here is the configuration that needs to go in the web.conf under the [settings] stanza.

  SSOMode = strict
 trustedIP = 127.0.0.1,10.3.1.61,10.1.8.81
 remoteUser = X-Remote-User
 tools.proxy.on = True

Configuring Splunkd properties

There is only one property in the splunk daemon trustedIP that is set in the server.conf under [settings] stanza with the following value:

trustedIP=127.0.0.1

Creating LDAP strategy for Authorization

As we have seen in the earlier section, Splunk daemon does the authorization before creating a web session(cookies) for the identity supplied via the request header(X-Remote-User). Using Splunk’s identity database for authz is trivial hence let us plan to use the same LDAP server used for authentication by the proxy server, for authorization as well. To make this happen you have to create a LDAP strategy in the Splunk using the same LDAP server used for authentication. Here is the REST command that would create the LDAP strategy for you.

curl -k  -u admin:changeme  -d "name=locaOpenDS"  --data-urlencode "bindDN=cn=directory manager" \ -d "bindDNpassword    =secret12"  --data-urlencode "groupBaseDN=O=Splunk Inc.,L=San Francisco,c=US" \ -d "groupMappingAttribute=dn" -d "groupMemberAttribute=member" -d "groupNameAttribute=cn" -d "host=10.3.1.61" \ -d "port=1389" -d "realNameAttribute=cn"  --data-urlencode  "userBaseDN=O=Splunk Inc.,L=San Francisco,c=US" \ -d "userNameAttribute=cn"  "https://localhost:8089/services/authentication/providers/LDAP"

That is it, we are done with the necessary  configurations required to integrate splunk web in to the enterprise  IT infrastructure,  there by delegating the authentication to the proxy server. In the next section let us trace the behaviour of SSO in realtime and learn how to trouble shoot the setup if not working.

Accessing the Splunkweb Via Proxy

Open a New browser and enter http://10.1.5.35:9090 in the address bar, you will be prompted for authentication, because the proxy is set to request for authentication for the  root of the URL by specifying front  slash (/) .  After a successful authentication the request header will be set based on that,  splunkweb will create a web session for the authenticated identity  “indira(jith) thangasamy”  after performing all the song and dance for authz. Here is a screen shot of proxy requesting for authentication up on trying to access splunkweb  URL.
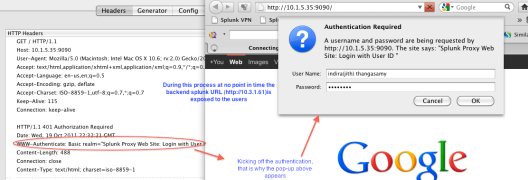
Invoke the Splunkweb via Proxy URL

Invoke the Splunkweb via Proxy URL – Figure 3

In the next  page(Figure 4), the splunkweb is rendered after going through the authorization process as we discussed in the foregoing section. The identity “indira(jith) thangasamy” is appropriately provisioned in the LDAP and mapped to a LDAP group in-turn that is mapped to a Splunk role. This part is not shown here.

Logout

As you can see the logout link is missing in Figure 4, this is intentional, for that matter there no single logout functionality yet provided. Because the HTTP basic Authorization header is still present along with the request header X-Remote-User with a valid value, any subsequent access using the same browser will seamlessly create a session for the identity that is present in the request header.  A Splunk logout link will only clear the browser cookies not the authorization header set by HTTP basic proxy auth or the request header set by the proxy. If  you access the Splunkweb by hitting the server directly then the existence of these headers will be immaterial.  The only way is to close the browser to clear the HTTP basic authz header(only if your proxy employed BASIC auth scheme, there are other scheme customers could resort to to stay away from this issue) , even then the splunk session will not be destroyed for this user, one way is to use the REST end point along with the session identifier to destroy the session, like the one shown below:

curl -s -uadmin:changeme  -k -X DELETE https://localhost:8089/services/authentication/httpauth-tokens/990cb3e61414376554a39e390471fff0
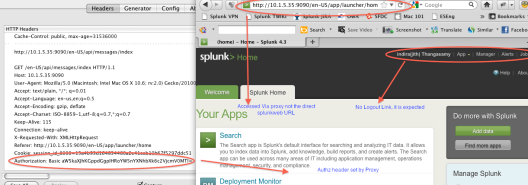
SplunkWeb SSO - Success - Figure 4

SplunkWeb SSO – Success – Figure 4

If you do not destroy the session, eventually it will be destroyed after reaching its time out value.

Troubleshooting

Splunkweb offers a great interface that would give out the environment and the run time data to enable the administrators to debug the deployment. This page can be accessed via the proxy or the direct URL using the the relative URL /debug/sso as shown in Figure 5. The request headers will not be available if you access this page directly with out going through the proxy server.
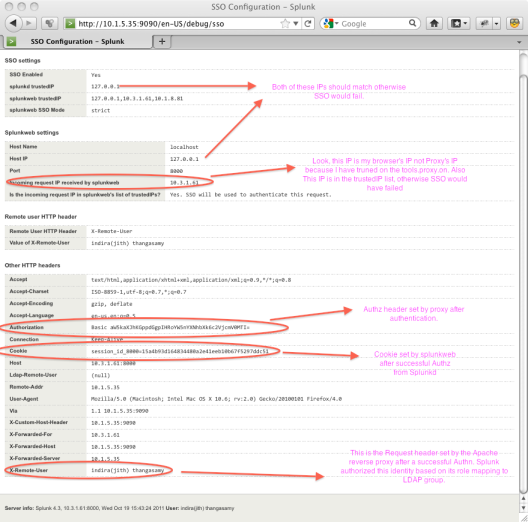
Troubleshooting with /debug/sso - Figure 5

Troubleshooting with /debug/sso – Figure 5

Let us look at one of the failure scenario, in this case we are accessing the splunkweb via proxy from a client whose IP address is not in the splunkweb’s trustedIP list. The SSO will fail, as you can see from the Figure 7, the client IP address does not match.

SSO Failure Scenario in strict mode - Figure 6

SSO Failure Scenario in strict mode – Figure 6

When you access the proxy URL from a untrusted client, you would see an error message as shown in the Figure 6. In this scenario  the SSOMode is set to strict in the configuration.
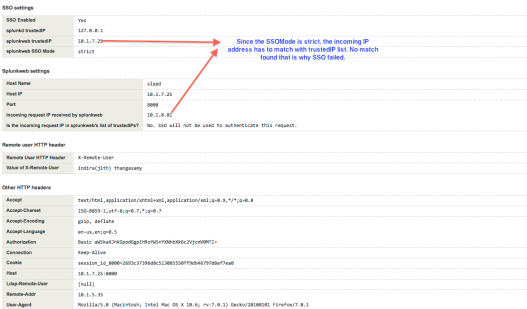
SSO Failure Scenario debug - Figure 7

SSO Failure Scenario debug – Figure 7

Conclusion

Splunk SSO is a misnomer for Splunkweb SSO, It is only the web interface of Splunk GUI is enabled to work seamlessly when the authentication delegated to an external entity. Nevertheless this is one of the paramount feature that enables customers to integrate the authentication and authorization of Splunkweb in to their existing infrastructure there by reducing the TCO  of Splunk for our customers.  Besides SSO also improves the usability of the product and complements the existing security infrastructure by seamlessly integrating itself without requiring for additional special accounts/privileges to be provisioned.

Book on OpenSSO/OpenAM

OpenSSO Book

 You can Order the book from this place https://www.packtpub.com/openam-snapshot-9-for-securing-your-web-applications/book

 Click here to view the book cover in PDF format

It is one of my childhood ambition to write books and see my writings
on the print.  I have written few articles in Tamil and English but
those are not more than 10 pages. I kind of believed that I have a
penchant for writing, in the past I have authored lot of technical
documents as part of my job for customers consumption.

When the editors at Packt publications
approached me about the possibility of authoring a book on OpenSSO, I
have readily accepted the offer hoping to complete the book in couple of
months. Later realized it took a month to even scope out contents of
the book, There are lot of information that can be shared about
OpenSSO/OpenAM, I have rather decided to focus on the access management
features before jumping on to web services security or a full fledged
federation services. There are many items that are in the book not
available in the public documentation, I grew from the ranks to a senior
manager in the Access Management organization served almost a decade on
OpenSSO and its predecessors alone, so I had to condense my ten years
of technical experience in to 200 pages book, that was one big
challenge.  Original plan was to complete  the book in 8 months, but it
took little over a year, partially the delay was attributed to
Oracle/Sun acquisition where I had to undergo another round of approval
from Oracle management to pursue on this book. Most of my Sun blog http://blogs.sun.com/indira contents are in the book.

I would like to thank every one
including the Packt publishers team, Forgerock Team,the people I have
worked with, Oracle Management,my friends,colleagues and family for
their support. I have thanked and acknowledged them appropriately in the book:-).

What is this book about?

Well, pretty much all you want to know about the OpenAM, the open source version of  Sun’s OpenSSO  product, now backed by Forgerock.com
who(my sincere thanks to these people for keeping the  project alive,
otherwise this book would  not have much  readership) provide support
and services for the OpenAM/OpenSSO deployments. Oracle continue provide
support for the OpenSSO 8.0 Enterprise deployments. This book is
written and tested based on the OpenSSO Express build 9 source code
branch, this build is no longer accessible  in its binary form(but the
source code is) for the external opens ource community. Forgerock
provide the equivalent build(built from the OpenSSO expressbuild 9
source code branch) under the code name OpenAM Snapshot 9 which can be
downloaded from http://www.forgerock.org/downloads/openam_release9_20100207.zip

There are subtle variations with
forgerock build with respect to the Orginal OpenSSO Express 9 primarily 
the version,. The forgerock version “ForgeRock OpenAM Express Build
9(2010-February-07 13:29)” is known to work with the examples mentioned
in this book. In some of the Screen shots the version might be
referencing the OpenSSO Express other than that functionally both should
be equivalent.

Some of the chapters like the password
reset,Backup/Restore,logging and identity stores(except the new types
like ADAM) will be applicable for the OpenSSO 8 enterprise as well.

Table of Contents of the book

Introduction

  • History of OpenAM
  • OpenSSO Vs OpenAM
  • OpenAM – An Overview
  • OpenAM – Services
  • Federation Services
  • Web Services Security and Secure Token Service(STS)
  • OpenAM Entitlements Service
  • What kind of problems does OpenAM Solve?
  • Access Management
  • Federation
  • Securing Web Services
  • Entitlements
  • Summary


OpenAM Deployment and Configuration

  • Deployment Requirements for OpenAM Web Application
  • Containers and Operating Systems Support
  • Java SDK Support
  • Disk and Memory Requirements
  • Browser Requirements
  • Configuration Store versus Identity Store
  • Configuration Store
  • Embedded Configuration Store
  • External Sun Directory Server Enterprise Edition Configuration Store
  • Identity Store
  • How to Obtain OpenAM
  • Building OpenAM from Source
  • Downloading OpenAM Binary
  • Configuring OpenAM
  • Install and Configure Apache Tomcat 6.0.20
  • OpenAM One Click Configuration
  • Verifying OpenAM Configuration
  • What Just Happened
  • OpenAM Configuration Choices
  • Single Server Configuration – Using Embedded Configuration Store
  • Layout of the configuration directory
  • Single Server Configuration – Using External Configuration Store
  • Multi Server Configuration –  Embedded Configuration Store
  • Prerequisites for multi-server Configuration Adding OpenAM to an existing deployment
  • Verification of Multi Server Deployment Configuring using Command Line Configurator
  • Configuring OpenAM with SSL/TLS
  • Configuring Command Line Tools
  • UnInstall OpenAM
  • OpenAM Release and Support Model
  • Summary

OpenAM Administration

  • Administration Interfaces
  • Accessing Administrative Console
  • Console Views and Privileges
  • Console Landing Page-Common Tasks
  • Access Control Tab
  • General
  • Authentication
  • Service
  • Data Stores
  • Privileges
  • Policies
  • Subjects
  • Managing users from Command Line Tool
  • Managing Groups from Command Line Tool
  • Agents
  • Configuration
  • Retrieving All the Server Properties
  • Updating Server Configuration Properties
  • Removing Properties from Server Configuration
  • Sessions Tab
  • Managing Sessions using ssoadm
  • Console Customization
  • Extending LDAP Schema
  • Customizing OpenAM User Service
  • Adding attributes to amUser.xml
  • Removing User Service Schema
  • Adding the updated User Service Schema
  • Adding the Labels
  • Adding the Custom Attributes to Data Store configurations
  • Updating Privileges
  • Testing the Changes
  • Summary

Authentication and Session Service

  • Authentication Process
  • Cookies in OpenAM
  • Authentication Types and URL parameters
  • Module
  • Level
  • Service
  • User
  • Role
  • Realm
  • Resource
  • Other Authentication URL Parameters
  • IDToken Parameter
  • goto  and gotoOnFail Parameter
  • locale Parameter
  • arg Parameter
  • iPSPCookie Parameter
  • ForceAuth Parameter
  • PersistAMCookie Parameter
  • Authentication Modules Instances and Chains
  • LDAP Authentication
  • Creating Authentication Instance
  • Updating Authentication Instance
  • Reading Authentication Instance
  • Using Authentication Instance
  • Deleting Authentication Instance
  • Authentication Chains
  • Creating Authentication Chain
  • Updating Authentication Chain
  • Reading Authentication Chain
  • Using Authentication Chain
  • Performing User Based Authentication
  • Deleting Authentication Chain
  • Authentication Modules
  • LDAP
  • Active Directory
  • Data Store
  • Anonymous
  • Certificate(X.509)
  • HTTP Basic
  • Membership
  • JDBC
  • HOTP
  • SecurID
  • SafeWord
  • RADIUS
  • Unix
  • Windows NT
  • Windows Desktop SSO
  • Core
  • User Profile Requirement
  • Setting User Profile attributes in SSO Token
  • Adding Custom Authentication Modules
  • Session Service
  • Session Service Schema
  • Updating Session Service
  • Session Life Cycle
  • Structure of a Session
  • Session State Transition
  • Session Properties
  • Session Change Notification and Polling
  • Session Persistence and Constraints
  • Summary

Password Reset

  • Account Lockout
  • Configuring Account Lockout
  • Physical Lockout
  • In-Memory Lockout
  • Password Reset Application
  • Prerequisites
  • Configure the Password Reset Service in OpenAM
  • Assign Service and Update Service Attributes
  • Creating and Assigning OpenDS Password Policy
  • Creating OpenDS Policy
  • Assigning the policy to a user
  • Forcing Password Change After Reset
  • Behind the Scenes
  • Where are the secret questions?
  • Summary

Protecting Web application using OpenAM

  • Protecting Sample Application on Tomcat
  • Creating the Agent Profile
  • Installing and Configuring the Agents
  • Deploying and Configuring the Java application
  • Create the Policies and associated identities
  • Testing the SSO
  • Fetching User Profile Attributes
  • Summary

Integrating OpenAM with Salesforce and Google Apps

  • Integrating with Salesforce Applications
  • Configuring Hosted Identity Provider and Circle of Trust
  • Configuring OpenAM Meta Data for Salesforce.com
  • Provisioning of User Identities
  • Verifying the SSO
  • Integrating With Google Apps
  • Configuring the Hosted Identity Provider
  • Configuring SSO parameters at Google Apps
  • Provisioning User Identities
  • SSO Verification
  • Summary

Identity Stores

  • Identity Repository Schema
  • Identity Store Types
  • Caching and Notification
  • Persistent Search based Notification
  • Time-To-Live (TTL) based Notification
  • TTL Specific Properties for Identity Repository Cache
  • Supported Identity Stores
  • User Schema
  • Access Manager Repository Plug-in
  • Creating Access Manager Repository Plug-in Data Store
  • Displaying the Data Store Properties
  • Updating Data Store Properties
  • Deleting Data Stores
  • Removing the Access Manager Repository Plugin
  • Oracle Directory Server Enterprise Edition
  • Creating Data Store for Oracle DSEE
  • Updating the Data Store
  • Deleting the Data Store
  • Data Store for OpenDS
  • Data Store for Tivoli DS
  • Data Store For Active Directory
  • Data Store For Active Directory Application Mode
  • Datastore for OpenLDAP
  • Configuring OpenLDAP Suffix
  • Extending the Schema
  • Preparing the Suffix with Necessary Entries
  • Creating OpenLDAP Data Store
  • Testing the Data Store
  • Multiple Data Stores
  • Summary

OpenAM – RESTful Identity Services

  • Prerequisites
  • Invoking REST Interfaces
  • Authentication
  • Authenticate with URL parameters
  • Validating SSO Token
  • Invalidating Session(Logout)
  • Creating Log Events
  • Authorization
  • Identity CRUD Operations
  • Searching Identities
  • Searching  for User Identities
  • Searching Groups
  • Searching for Agents
  • Retrieving Identity Attributes
  • Creating Agent Identities
  • Creating User Identities
  • Creating Group Identities
  • Updating Identities
  • Deleting Identities
  • Deleting User Identities
  • Deleting Group Identities
  • Deleting the Agent Identities
  • Other REST Interfaces
  • Summary

OpenAM Backup,Restore and Logging

  • Backup of Configuration Data
  • Backing up OpenAM Configuration files
  • Backing up the OpenAM Configuration Data
  • Crash Recovery and Restore
  • Test to Production
  • How to Perform the Configuration Change
  • Export Test Server Configuration
  • Configure OpenAM on the Production Server
  • Adapt the Test Configuration Data
  • Importing in to Production System
  • OpenAM Audit and Logging
  • Enabling Debug (Trace) level Logging
  • Audit Logging
  • Enabling and Disabling Audit logging
  • File Based Logging
  • Database Logging
  • Oracle
  • MySQL
  • Remote Logging
  • Secure Logging
  • Creating the Keystore
  • How to verify
  • Summary

Troubleshooting and Diagnostics

  • OpenAM Diagnostic Tools
  • Installing and Configuring the Tool
  • Invoking the Tool
  • Troubleshooting
  • Installation and Configuration
  • Scenario 1:
  • Scenario 2
  • Scenario 3
  • How to Fix
  • Scenario 4
  • Authentication and Session
  • Scenario 1:
  • Scenario 2
  • Scenario 3
  • Scenario 4
  • Identity Repository and Password Reset
  • Scenario 1
  • Scenario 2
  • Scenario 3
  • Scenario 4
  • Scenario 5
  • Policy and Agents
  • Scenario 1
  • Scenario 2
  • Scenario 3:
  • Command Line Tools
  • Scenario 1
  • Scenario 2
  • Summary

Loads of source code and scripts available for download
from the packtpubs website as part of code bundle, you need to have
this to run many of the sample quoted in the book. If you have any
comments/questions, leave them in the comments section, I will try to
respond to them.

My Book on OpenAM (formerly OpenSSO)

Book CoverIt is one of my childhood ambition to write books and see my writings on the print.  I have written few articles in Tamil and English but those are not more than 10 pages. I kind of believed that I have a penchant for writing, in the past I have authored lot of technical documents as part of my job for customers consumption.

When the editors at Packt publications approached me about the possibility of authoring a book on OpenSSO, I have readily accepted the offer hoping to complete the book in couple of months. Later realized it took a month to even scope out contents of the book, There are lot of information that can be shared about OpenSSO/OpenAM, I have rather decided to focus on the access management features before jumping on to web services security or a full fledged federation services. There are many items that are in the book not available in the public documentation, I grew from the ranks to a senior manager in the Access Management organization served almost a decade on OpenSSO and its predecessors alone, so I had to condense my ten years of technical experience in to 200 pages book, that was one big challenge.  Original plan was to complete  the book in 8 months, but it took little over a year, partially the delay was attributed to Oracle/Sun acquisition where I had to undergo another round of approval from Oracle management to pursue on this book. Most of my Sun blog http://blogs.sun.com/indira contents are in the book.

I would like to thank every one including the Packt publishers team, Forgerock Team,the people I have worked with, Oracle Management,my friends,colleagues and family for their support. I have thanked and acknowledged them appropriately in the book:-).

What is this book about?

Well, pretty much all you want to know about the OpenAM, the open source version of  Sun’s OpenSSO  product, now backed by Forgerock.com who(my sincere thanks to these people for keeping the  project alive, otherwise this book would  not have much  readership) provide support and services for the OpenAM/OpenSSO deployments. Oracle continue provide support for the OpenSSO 8.0 Enterprise deployments. This book is written and tested based on the OpenSSO Express build 9 source code branch, this build is no longer accessible  in its binary form(but the source code is) for the external opens ource community. Forgerock provide the equivalent build(built from the OpenSSO expressbuild 9 source code branch) under the code name OpenAM Snapshot 9 which can be downloaded from http://www.forgerock.org/downloads/openam_release9_20100207.zip

There are subtle variations with forgerock build with respect to the Orginal OpenSSO Express 9 primarily  the version,. The forgerock version “ForgeRock OpenAM Express Build 9(2010-February-07 13:29)” is known to work with the examples mentioned in this book. In some of the Screen shots the version might be referencing the OpenSSO Express other than that functionally both should be equivalent.

Some of the chapters like the password reset,Backup/Restore,logging and identity stores(except the new types like ADAM) will be applicable for the OpenSSO 8 enterprise as well.

Table of Contents of the book

Introduction

  • History of OpenAM
  • OpenSSO Vs OpenAM
  • OpenAM – An Overview
  • OpenAM – Services
  • Federation Services
  • Web Services Security and Secure Token Service(STS)
  • OpenAM Entitlements Service
  • What kind of problems does OpenAM Solve?
  • Access Management
  • Federation
  • Securing Web Services
  • Entitlements
  • Summary


OpenAM Deployment and Configuration

  • Deployment Requirements for OpenAM Web Application
  • Containers and Operating Systems Support
  • Java SDK Support
  • Disk and Memory Requirements
  • Browser Requirements
  • Configuration Store versus Identity Store
  • Configuration Store
  • Embedded Configuration Store
  • External Sun Directory Server Enterprise Edition Configuration Store
  • Identity Store
  • How to Obtain OpenAM
  • Building OpenAM from Source
  • Downloading OpenAM Binary
  • Configuring OpenAM
  • Install and Configure Apache Tomcat 6.0.20
  • OpenAM One Click Configuration
  • Verifying OpenAM Configuration
  • What Just Happened
  • OpenAM Configuration Choices
  • Single Server Configuration – Using Embedded Configuration Store
  • Layout of the configuration directory
  • Single Server Configuration – Using External Configuration Store
  • Multi Server Configuration –  Embedded Configuration Store
  • Prerequisites for multi-server Configuration Adding OpenAM to an existing deployment
  • Verification of Multi Server Deployment Configuring using Command Line Configurator
  • Configuring OpenAM with SSL/TLS
  • Configuring Command Line Tools
  • UnInstall OpenAM
  • OpenAM Release and Support Model
  • Summary

OpenAM Administration

  • Administration Interfaces
  • Accessing Administrative Console
  • Console Views and Privileges
  • Console Landing Page-Common Tasks
  • Access Control Tab
  • General
  • Authentication
  • Service
  • Data Stores
  • Privileges
  • Policies
  • Subjects
  • Managing users from Command Line Tool
  • Managing Groups from Command Line Tool
  • Agents
  • Configuration
  • Retrieving All the Server Properties
  • Updating Server Configuration Properties
  • Removing Properties from Server Configuration
  • Sessions Tab
  • Managing Sessions using ssoadm
  • Console Customization
  • Extending LDAP Schema
  • Customizing OpenAM User Service
  • Adding attributes to amUser.xml
  • Removing User Service Schema
  • Adding the updated User Service Schema
  • Adding the Labels
  • Adding the Custom Attributes to Data Store configurations
  • Updating Privileges
  • Testing the Changes
  • Summary

Authentication and Session Service

  • Authentication Process
  • Cookies in OpenAM
  • Authentication Types and URL parameters
  • Module
  • Level
  • Service
  • User
  • Role
  • Realm
  • Resource
  • Other Authentication URL Parameters
  • IDToken Parameter
  • goto  and gotoOnFail Parameter
  • locale Parameter
  • arg Parameter
  • iPSPCookie Parameter
  • ForceAuth Parameter
  • PersistAMCookie Parameter
  • Authentication Modules Instances and Chains
  • LDAP Authentication
  • Creating Authentication Instance
  • Updating Authentication Instance
  • Reading Authentication Instance
  • Using Authentication Instance
  • Deleting Authentication Instance
  • Authentication Chains
  • Creating Authentication Chain
  • Updating Authentication Chain
  • Reading Authentication Chain
  • Using Authentication Chain
  • Performing User Based Authentication
  • Deleting Authentication Chain
  • Authentication Modules
  • LDAP
  • Active Directory
  • Data Store
  • Anonymous
  • Certificate(X.509)
  • HTTP Basic
  • Membership
  • JDBC
  • HOTP
  • SecurID
  • SafeWord
  • RADIUS
  • Unix
  • Windows NT
  • Windows Desktop SSO
  • Core
  • User Profile Requirement
  • Setting User Profile attributes in SSO Token
  • Adding Custom Authentication Modules
  • Session Service
  • Session Service Schema
  • Updating Session Service
  • Session Life Cycle
  • Structure of a Session
  • Session State Transition
  • Session Properties
  • Session Change Notification and Polling
  • Session Persistence and Constraints
  • Summary

Password Reset

  • Account Lockout
  • Configuring Account Lockout
  • Physical Lockout
  • In-Memory Lockout
  • Password Reset Application
  • Prerequisites
  • Configure the Password Reset Service in OpenAM
  • Assign Service and Update Service Attributes
  • Creating and Assigning OpenDS Password Policy
  • Creating OpenDS Policy
  • Assigning the policy to a user
  • Forcing Password Change After Reset
  • Behind the Scenes
  • Where are the secret questions?
  • Summary

Protecting Web application using OpenAM

  • Protecting Sample Application on Tomcat
  • Creating the Agent Profile
  • Installing and Configuring the Agents
  • Deploying and Configuring the Java application
  • Create the Policies and associated identities
  • Testing the SSO
  • Fetching User Profile Attributes
  • Summary

Integrating OpenAM with Salesforce and Google Apps

  • Integrating with Salesforce Applications
  • Configuring Hosted Identity Provider and Circle of Trust
  • Configuring OpenAM Meta Data for Salesforce.com
  • Provisioning of User Identities
  • Verifying the SSO
  • Integrating With Google Apps
  • Configuring the Hosted Identity Provider
  • Configuring SSO parameters at Google Apps
  • Provisioning User Identities
  • SSO Verification
  • Summary

Identity Stores

  • Identity Repository Schema
  • Identity Store Types
  • Caching and Notification
  • Persistent Search based Notification
  • Time-To-Live (TTL) based Notification
  • TTL Specific Properties for Identity Repository Cache
  • Supported Identity Stores
  • User Schema
  • Access Manager Repository Plug-in
  • Creating Access Manager Repository Plug-in Data Store
  • Displaying the Data Store Properties
  • Updating Data Store Properties
  • Deleting Data Stores
  • Removing the Access Manager Repository Plugin
  • Oracle Directory Server Enterprise Edition
  • Creating Data Store for Oracle DSEE
  • Updating the Data Store
  • Deleting the Data Store
  • Data Store for OpenDS
  • Data Store for Tivoli DS
  • Data Store For Active Directory
  • Data Store For Active Directory Application Mode
  • Datastore for OpenLDAP
  • Configuring OpenLDAP Suffix
  • Extending the Schema
  • Preparing the Suffix with Necessary Entries
  • Creating OpenLDAP Data Store
  • Testing the Data Store
  • Multiple Data Stores
  • Summary

OpenAM – RESTful Identity Services

  • Prerequisites
  • Invoking REST Interfaces
  • Authentication
  • Authenticate with URL parameters
  • Validating SSO Token
  • Invalidating Session(Logout)
  • Creating Log Events
  • Authorization
  • Identity CRUD Operations
  • Searching Identities
  • Searching  for User Identities
  • Searching Groups
  • Searching for Agents
  • Retrieving Identity Attributes
  • Creating Agent Identities
  • Creating User Identities
  • Creating Group Identities
  • Updating Identities
  • Deleting Identities
  • Deleting User Identities
  • Deleting Group Identities
  • Deleting the Agent Identities
  • Other REST Interfaces
  • Summary

OpenAM Backup,Restore and Logging

  • Backup of Configuration Data
  • Backing up OpenAM Configuration files
  • Backing up the OpenAM Configuration Data
  • Crash Recovery and Restore
  • Test to Production
  • How to Perform the Configuration Change
  • Export Test Server Configuration
  • Configure OpenAM on the Production Server
  • Adapt the Test Configuration Data
  • Importing in to Production System
  • OpenAM Audit and Logging
  • Enabling Debug (Trace) level Logging
  • Audit Logging
  • Enabling and Disabling Audit logging
  • File Based Logging
  • Database Logging
  • Oracle
  • MySQL
  • Remote Logging
  • Secure Logging
  • Creating the Keystore
  • How to verify
  • Summary

Troubleshooting and Diagnostics

  • OpenAM Diagnostic Tools
  • Installing and Configuring the Tool
  • Invoking the Tool
  • Troubleshooting
  • Installation and Configuration
  • Scenario 1:
  • Scenario 2
  • Scenario 3
  • How to Fix
  • Scenario 4
  • Authentication and Session
  • Scenario 1:
  • Scenario 2
  • Scenario 3
  • Scenario 4
  • Identity Repository and Password Reset
  • Scenario 1
  • Scenario 2
  • Scenario 3
  • Scenario 4
  • Scenario 5
  • Policy and Agents
  • Scenario 1
  • Scenario 2
  • Scenario 3:
  • Command Line Tools
  • Scenario 1
  • Scenario 2
  • Summary

Loads of source code and scripts available for download from the packtpubs website as part of code bundle, you need to have this to run many of the sample quoted in the book. If you have any comments/questions, leave them in the comments section, I will try to respond to them.

JBOSS: OpenSSO losing Configuration after restart

It is not uncommon that once you restart the JBOSS application server, subsequent access to OpenSSO server will show you the configurator page. Do not panic, this is some thing known., this is due to ServletContext.getRealPath() method does not always return the same value after the server is restarted.

How to Fix

Edit the  <DEPLOY_BASE>/server/default/deploy/opensso.war/WEB-INF/classes/bootstrap.properties

and the configuration.dir)=<opensso-config-dir>

where <opensso-config-dir> is a directory that contains the bootstrap file

after performing the above step restart the JBOSS server, you will be able to see the login page from OpenSSO.

You can use this property when the system user that is running the web/application server process does not have a home directory. i.e. System.getProperty(“user.home”) returns null.

OpenSSO Policy Agents 3.0 on Glass Fish Cluster

OpenSSO Policy Agents (PA)3.0  on Glass Fish  Cluster

1.0 Introduction

The goal of this document is to enable the reader to be able to  protect their Java EE application deployed on Glass Fish Enterprise Server 2.1 Cluster using OpenSSO and Policy Agents 3.0. This document is verified and validated with OpenSSO policy agents 3.0 and GFv2.1 EE cluster as described in the next section.

2.0 Product versions

This procedure is verified with OpenSSO Server Express 8 build with the corresponding Java EE agents 3.0. Glassfish version is Sun GlassFish Enterprise Server v2.1 (9.1.1) (build b60f-fcs). Assumes an OpenSSO server and GFv2.1 cluster is already setup.

3.0 Glass Fish Cluster

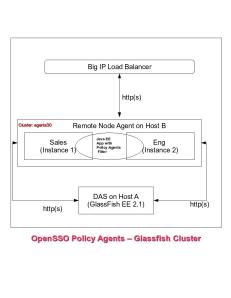
For simplicity I have created a simple cluster with one node agent and 2 instances. These instances are load balanced with a Big IP Load Balancer Virtual IP. Creating glass fish cluster is out of scope for this document. There are lot of resources available in the internet including  the aquarium.

Typical GFv2.1 Cluster Deployment

Typical GFv2.1 Cluster Deployment

You should edit the config/asadminenv.conf to set AS_ADMIN_SECURE=false , since   the cluster profile sets admin port as non SSL.

Once this cluster is setup, you are pretty much ready to install the agents. For illustration purposes I am going to use ‘agents30‘ is my cluster it has corresponding ‘agents30-config’ node in the domain.xml (or simply agents30-config if you view from UI) This configuration name is the key information for the OpenSSO Policy  agents configuration.

You can verify the cluster setup by accessing the sample application ‘clusterjsp’ using the LB url
for eg: http://is-lb-2.red.iplanet.com:38181/clusterjsp

4.0 Installing the OpenSSO Policy Agents.

The typical glassfish cluster scenario is depicted in the image below, this I have made for simplicity. A Cluster can have multiple remote node agents with many clusters along with server instances. The same procedure can be applied irrespective of the complexity of the clusters setup.  Protecting the Java EE clustered applications using OpenSSO policy agents is a two step process.

  1. Installing OpenSSO Policy Agents on the  Domain Administration Server(DAS) running on Host A
  2. Performing the OpenSSO Policy Agents specific configuration changes on the Glass Fish clustered instances

Performing  OpenSSO Policy Agents installation on the  Domain Administration Server is a straight forward procedure, Policy agents installer facilitate this step. The second step  is inherently manual require meticulous  planning and execution, Any erroneous execution could potentially render  the cluster unusable. Detailed  procedure of these two steps are in the following sections.

4.1 Installation of OpenSSO Policy Agents on DAS

The Domain Administration Server (DAS) is the one that manage the cluster where the Java EE application is deployed. To install the policy agents first obtain the latest Java EE agents for Glass Fish v2/Application Server 9.1 from http://download.java.net/
Unzip the binary appserver_v9_agent_3.zip to a directory that can be accessed by the DAS process. Follow the Policy Agents installation procedure to install and configure for the DAS instance. During this process make sure the server instance name is the default configuration(server).
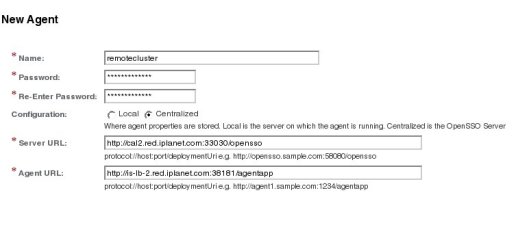
Login to your OpenSSO server and create an agent profile for this agent, let us call ‘remotecluster’ as the agent identity that will be used while installing the agents.

Agents Profile

Agents Profile

Here is the sample silent installation response file to configure the policy agents to the DAS instance. You need to invoke
./agentadmin  –custom-install   –useResponse filename.inf

where filename.inf is

## Agent User Response File START OF FILE
 CONFIG_DIR= /export/sun/gf2.1/domains/telco/config
 INSTANCE_NAME= server
 AM_SERVER_URL= http://cal2.red.iplanet.com:33030/opensso
 DAS_HOST_IS_REMOTE= false
 AGENT_URL= http://is-lb-2.red.iplanet.com:38181/agentapp
 AGENT_ENCRYPT_KEY= cW18Pj2R9Mt7mdvzDUL5+LMMUhm+qeIp
 AGENT_PROFILE_NAME= remotecluster
 AGENT_PASSWORD_FILE= /tmp/pass
 CREATE_AGENT_PROFILE_NAME= false
 AGENT_ADMINISTRATOR_NAME=
 AGENT_ADMINISTRATOR_PASSWORD_FILE=
 REMOTE_INSTANCE_LOCAL_DAS= false
 AGENT_INSTANCE_NAME=
 REMOTE_AGENT_INSTALL_DIR=
 ##Agent User Response File END OF FILE

NOTE:
Remember to   stop   all the domains,instances and node agents before starting the policy agents installation process.  If you fail to do so, you might lose all the OpenSSO policy agents installation changes in the domain.xml of the DAS instance. This happens because the OpenSSO policy agent installer manipulates the domain.xml using file editing tools.(Work in progress to use asadmin for these changes).

Then the policy agents configuration files, appropriate JARs and the locale files will be copied to the cluster configuration directory of the domain  directory that manages the cluster. Glass Fish cluster configuration automatically replicate the policy agent specific files to the remote cluster instances. This feature helps us from not installing the policy agents on the remote GF server instances.

In essence the policy agents installer makes following changes in the DAS instance.

  • Java Class Path Suffix added with the JARs and locale files of the agents in the domain.xml  for the ‘server-config’ target only(this is because we selected ‘server’ instance at the time of installation of PA). Neither for the default-config nor the ‘agents30-config’  targets.  This distinction is critical to make sure we properly configure the agents to protect the application deployed on the target ‘agents30-config’.(agents30 is our cluster configuration)
  • ${path.separator}/export/sun/j2ee_agents/appserver_v9_agent/lib/agent.jar${path.separator}/export/sun/j2ee_agents/appserver_v9_agent/lib/openssoclientsdk.jar${path.separator}/export/sun/j2ee_agents/appserver_v9_agent/locale${path.separator}/export/sun/j2ee_agents/appserver_v9_agent/Agent_001/config”

where

  • /export/sun is the base directory(BASE_DIR) where you have unzipped the appserver_v9_agent_3.zip
  • Agent_001 is the agent instance that is created in sec 4.1
  • Adding the JVM option for the target ‘server-config’  to enable the policy agents logging

– Djava.util.logging.config.file=<BASE_DIR>/j2ee_agents/appserver_v9_agent/config/OpenSSOAgentLogConfig.properties”

  • Adding the J2EE permissions to read the agents JARs in the server.policy, following policy will be added in server.policy

grant codeBase “file:<BASE_DIR>/j2ee_agents/appserver_v9_agent/lib/*” {
permission java.security.AllPermission;
};

  • Add the agent realm in config/login.conf

agentRealm {
com.sun.identity.agents.appserver.v81.AmASLoginModule  required;
};

  • A new authentication  realm ‘ agentRealm’ will be created for the ‘server’ instance
  • The default authentication realm for ‘server’ instance will be set to ‘ agentRealm’

That is all happens under the cover when you install the policy agents installer.
Now we need to apply these changes to the cluster configuration so the applications deployed on these clusters can be protected using OpenSSO Policy agents.

4.2 Performing PA Configuration on the Cluster

This step involves running a sequence of GF v2.1 EE administrative commands. The sequence and syntax all matters, please follow the instructions as it is given.  First make sure you have started the DAS instance in order to run the following sequence of commands. Just start only the DAS instance not the cluster instances.
Login to the DAS server(Host A) and make sure the asadmin command line utility is in the PATH.

4.2.1 Copy the agents configuration to cluster configuration directory

From the DAS host copy the PA’s configuration files and libraries to the GF cluster configuration directory so that these files will be available in the remote instances. If this is not done then PA sould be installed on each instance that belong to the cluster. To avoid this duplicate effort as well as to manage the policy configuration from the centralized location(in this case from DAS) you should do the following steps.
change directory to <BASE_DIR>/j2ee_agents/appserver_v9_agent

 /bin/cp -r  Agent_001  config lib  locale   ${com.sun.aas.instanceRoot}/config/agents30-config/

Any subsequent change that you make in these directories must be copied to the above location otherwise the cluster will not get the updates you make in the agents configuration files.

4.2.2 Make the configuration changes

Create a text file named   P_FILE containing the GF admin and master password.

 P_FILE=/tmp/.gfpass
 echo 'AS_ADMIN_ADMINPASSWORD=secret12' > $P_FILE
 echo 'AS_ADMIN_PASSWORD=secret12' >> $P_FILE
 echo 'AS_ADMIN_MASTERPASSWORD=changeit' >> $P_FILE

make sure the asadmin command is in the PATH

 export PATH=/export/sun/gf2.1/bin/:$PATH

Following sequence of commands add the necessary PA configuration parameters to the agents30 cluster configuration. Once this process is complete you need to restart the whol cluster setup. At this point only the DAS administration server is running on port 34848, rest all are shut down.  All these commands are executed in a unix terminal(on DAS host, assuming admin server running on http) in this example, please follow respective syntax that is suitable for your environment.

4.2.2.1 Set the logging properties

asadmin create-jvm-options --port 34848 --user admin --passwordfile $P_FILE --target agents30-config "-Djava.util.logging.config.file=\${com.sun.aas.instanceRoot}/config/agents30-config/config/OpenSSOAgentLogConfig.properties"

4.2.2.2 Set the COMPAT mode OFF

asadmin create-jvm-options --port 34848 --user admin --passwordfile $P_FILE --target agents30-config "-DLOG_COMPATMODE=Off"

4.2.2.3 Create the agent authentication realm

asadmin create-auth-realm --port 34848 --user admin --passwordfile $P_FILE --classname com.sun.identity.agents.appserver.v81.AmASRealm --property jaas-context=agentRealm --target agents30-config agentRealm

4.2.2.4 Set the default realm to agents realm

asadmin set agents30-config.security-service.default-realm=agentRealm

4.2.2.5 Add the Classpath suffix

asadmin set  agents30-config.java-config.classpath-suffix="\${path.separator}/\${com.sun.aas.instanceRoot}/config/agents30-config/lib/agent.jar\${path.separator}\${com.sun.aas.instanceRoot}/config/agents30-config/lib/openssoclientsdk.jar\${path.separator}/\${com.sun.aas.instanceRoot}/config/agents30-config/locale\${path.separator}\${com.sun.aas.instanceRoot}/config/agents30-config/Agent_001/config"

Note the $ is escaped with backslash(\) this is required when it is executed in the shell environment.

4.2.2.6 Edit the server.policy

If you have enabled the J2EE security(means you have -Djava.security.manager JVM option) for the cluster then you have to allow permission to read the agent’s JARs located in {com.sun.aas.instanceRoot}/config/agents30-config/lib directory. This can be done by editing the {com.sun.aas.instanceRoot}/config/server.policy. Append the following line in the {com.sun.aas.instanceRoot}/config/server.policy.

  • grant codeBase “file:${com.sun.aas.instanceRoot}/config/agents30-config/lib/-” {

permission java.security.AllPermission;
};

This update will be automatically pushed to the remote instances when you restart the cluster after completing this procedure.

4.2.2.7 Deploy the agentapp.war on the cluster

This is one of the critical step that you need to perform. Make sure this application is deployed on the cluster not just on one instance.
For instance in this example agentapp.war is deployed using the following command

 ./asadmin deploy --target agents30  --host hostA.red.iplanet.com  --port 34848 --availabilityenabled=true /export/sun/j2ee_agents/appserver_v9_agent/etc/agentapp.war

This application is required for the agents receive notification as well as this app is required to perform   Cross Domain SSO

5.0 Verification of PA configuration

Once you complete the section 4.x, now the cluster is ready to be tested. In order to test the  Java EE policy agents there is a sample called agentsample.ear that shipped with the PA binary. You have to deploy this EAR file in to your cluster.  This can be done by simply invoking the ‘asadmin’ with deploy option on the host where DAS is running.

 ./asadmin deploy --target agents30 --port 34848 --availabilityenabled=true /export/sun/j2ee_agents/appserver_v9_agent/sampleapp/dist/agentsample.ear

Now Login to OpenSSO server and navigate to the J2EE agent identity ‘remotecluster’ property with the label Agent Filter Mode, remove the current value ‘ALL’ and add the value SSO_ONLY. This will ask only for authentication for the resource being access from the cluster URL which is http://is-lb-2.red.iplanet.com:38181/agentsample/index.html When you access this URL the cluster will redirect to your OpenSSO server, with valid user name/password pair you will get access to this page.

You can do much more using this sample such as exhibiting Java EE programmatic and declarative security. You can find more on this by reading the readme under /export/sun/j2ee_agents/appserver_v9_agent/sampleapp directory.

Make sure restart the DAS and cluster together with node agent to get these configuration change propagated.  Even though the documents say that changes will be published to the nodes automatically, I need to supply the –syncinstances=true option while starting the node agent, only then I could see the configuration changes reflected in the remote instances.

APPENDIX

Creating cluster

P_FILE=/tmp/.gfpass
echo ‘AS_ADMIN_ADMINPASSWORD=secret12’ > $P_FILE
echo ‘AS_ADMIN_PASSWORD=secret12’ >> $P_FILE
echo ‘AS_ADMIN_MASTERPASSWORD=changeit’ >> $P_FILE
GF_INSTALL_DIR/bin/asadmin create-domain –adminport 34848 –user admin –passwordfile $P_FILE –interactive=false –profile cluster telco
GF_INSTALL_DIR/bin/asadmin start-domain –user admin –passwordfile $P_FILE  telco
GF_INSTALL_DIR/bin/asadmin create-node-agent –user admin –port 34848 –interactive=false –passwordfile $P_FILE telco-nodeagent
GF_INSTALL_DIR/bin/asadmin create-cluster –port 34848 agents30
GF_INSTALL_DIR/bin/asadmin create-instance –port 34848 –nodeagent telco-nodeagent –systemproperties HTTP_LISTENER_PORT=38080 –cluster agents30 sales
GF_INSTALL_DIR/bin/asadmin create-instance –port 34848 –nodeagent telco-nodeagent –systemproperties HTTP_LISTENER_PORT=38081 –cluster agents30 eng
GF_INSTALL_DIR/bin/asadmin start-node-agent –user admin –interactive=false –passwordfile $P_FILE telco-nodeagent
GF_INSTALL_DIR/bin/asadmin deploy –target agents30 –port 34848 –availabilityenabled=true samples/quickstart/clusterjsp/clusterjsp.ear
GF_INSTALL_DIR/bin/asadmin start-cluster –port 34848 –interactive=false –passwordfile $P_FILE agents30

To start and Stop the cluster

asadmin stop-cluster agents30
asadmin stop-node-agent
asadmin stop-domain telco
asadmin start-domain telco
asadmin start-node-agent --syncinstances=true
asadmin start-cluster agents30

OpenSSO Policy Agents 3.0 on Glass Fish Cluster

The goal of this document is to enable the reader to be able to 
protect their Java EE application deployed on Glass Fish Enterprise
Server 2.1 Cluster using OpenSSO and Policy Agents 3.0. This document
is verified and validated with OpenSSO policy agents 3.0 and GFv2.1 EE
cluster as described in the next section. Read more on 

https://indirat.wordpress.com/2009/10/13/policyagentsongfcluster/